
Learn how to make nutritious homemade cat food recipes with this easy-to-follow guide. Discover the benefits of using fresh ingredients like chicken thighs, hearts, and livers to create a balanced diet for your feline friends. Perfect for pet owners looking to save money and ensure their cats are eating healthy.
Introduction to Making Homemade Cat Food Recipes
I’m making homemade raw food for the cats that are going to be cheaper than Friskies, Stella, Splash, Simba, Hydrox, and the Lucky Ferals.

Main Ingredients for Homemade Cat Food
These are the main ingredients that I am using: I have pounds of fresh chicken thighs and a package of chicken hearts. We will only use some of them, and I have a container of chicken livers. We’re only using some of these. The first thing I’m going to do is weigh out the chicken hearts and the chicken livers so I have enough for this recipe. Anything left over, I am going to freeze and use for the next time that I make homemade raw food for the cats.
Weighing Out the Chicken Hearts
Here’s my food scale, and I want to weigh out the ounces of the chicken hearts. I am going to put these aside, and we’ll be using this in the recipe. What’s left in the package will go into a freezer-safe container in my freezer. This is Stella; she gets very excited every time I make homemade raw food and always wants to help me.
Measuring the Raw Liver
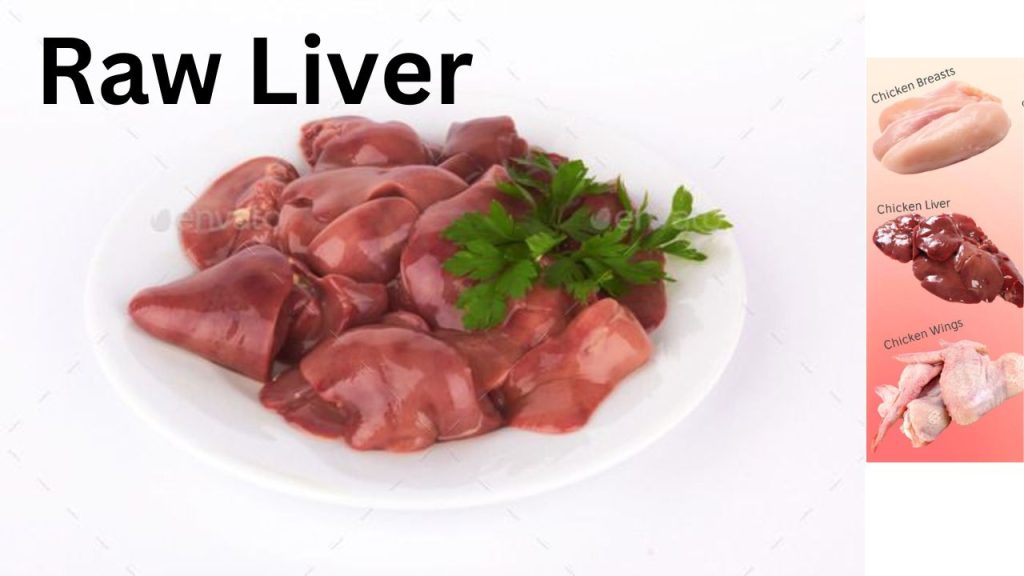
Now we’re going to measure out ounces of the raw liver. I buy the liver and hearts at local ethnic markets. Sometimes it can be very hard to find chicken hearts or chicken livers in a regular supermarket, but if you have a local ethnic market, like a local Asian market, a local Russian market, or a local Italian market, that’s where I find these organ meats. If you have a hard time finding them, that’s where I would suggest looking for them.
Substituting Ingredients When Necessary
The recipe calls for ounces of the chicken livers and ounces of the chicken hearts. If you cannot find the chicken hearts, you can add extra taurine. You could add milligrams of extra taurine if you can’t find the chicken hearts and replace that with ounces of chicken thigh meat. We’re using ounces of chicken hearts, and again, if you can’t find them, use milligrams of taurine and ounces of the chicken thighs in place of the hearts. But if you can find the hearts, definitely get the hearts because organ meats such as hearts and liver are full of vitamins, minerals, and nutrients that are important for your cat.
The Importance of Organ Meats in a Cat’s Diet
You have to remember that when a cat is living in the wild and they’re killing their prey, they’re not just eating the muscle meat; they’re eating all of the internal organs also because the organs are full of nutrients. So that’s why we want to make sure we include organ meats in our recipe.
Understanding Byproducts in Cat Food
If you’re looking at the ingredients in a can of cat food, these should be listed as chicken livers and chicken hearts, but sometimes they’re referred to as byproducts. These would be chicken byproducts because anything that is not muscle meat is a byproduct. In many cases, when you see the word byproduct on a can of cat food, as long as it specifies where the byproducts are from, there’s nothing bad about that. If it says chicken byproducts, you know it’s from a chicken, and you know it’s something other than the muscle meat.
Why Organ Meats Are Essential
If you think about what a cat eats when it kills a bird, it’s not just eating the muscle meat; it’s eating all the byproducts, everything including the muscle meat. That’s why it’s really important to include organ meats when you make homemade food.
Preparing Chicken for Grinding
The next thing we want to do is get our chicken ready for the grinder. I have a bowl here; I’ll be putting the chicken in this bowl. The recipe I’m using says to take the skin off half of the chicken, so I’m going to take the skin off this entire package of chicken. If you have cats that are on the chubby side, you can take the skin off all of the chicken.
Considering Fat Content in Your Cat’s Diet
You don’t want to remove the fat from the chicken because cats need to get a healthy amount of fat in their diet. But if you’re trying to reduce the weight of your cats, you could take the skin off all the pieces of chicken or take the skin off of a percentage of the pieces of chicken. If you’re trying to maintain weight, just take the skin off half the pieces of chicken. For this recipe, we’re going to take the skin off half the pieces.
How to Remove Skin from Chicken Thighs
So here’s a chicken thigh; it’s good to wear gloves for this. I just pull the skin off like that. There’s still a little bit of fat on it, but that’s okay. If you want to trim some of the skin that might not pull off, you could also do that. If you have a use for this chicken skin, put it to good use, but we’re not going to be using it in this recipe.
Removing Bones from Chicken Thighs
This recipe says to remove a percentage of the bone from these chicken thighs, so each pack has pieces of chicken. I just took the skin off all the pieces of chicken, and so we’re going to remove the bones from some of those pieces. That will be the percentage because I have a total of pieces, and a percentage of that is bones.
How to Debone Chicken Thighs
Here’s my chicken thigh, and this is the way I take the bone out. I am not a chef; this is probably not the professional way to do it, but this is the way I do it. So I put the chicken thigh on the board so that I can see the bone, and then I just try to cut along the bone on one side. Then I turn it around and try to cut along the bone on the other side. Our goal is just to get the bone out; it doesn’t have to be pretty.
Cutting the Bone Free
Then I’ll take my knife and carefully put it underneath the bone and work my way up to the top and just kind of cut it free the best I can. This is not like a cooking show you see on TV; nothing has to look pretty; it’s all going to be thrown in a grinder for cats. I just take my knife and kind of work it down the bone to free up as much meat as I can, and then now that we’re on the bottom, I just try to cut the rest of the bone free.
Finishing the Deboning Process
There’s the bone; that’s not too bad. Then I think there’s a little bit more here; maybe it’s just some tough cartilage. You can use any knife that you’re comfortable using; you can use a large chef’s knife if you’re comfortable with that. I like to use a utility knife.
Preparing Chicken Thighs for Grinding
I need to do this for a few more of these thighs. I just opened the second package of chicken thighs, and I’m going to show you how I cut these into smaller pieces to fit the grinder better. Here’s my chicken thigh; it’s bone side up, and I’m just going to cut off a part of it. This still has the skin on it, and then I’m just going to cut off another chunk on this side. Again, it is more helpful if you have a sharp knife, so these pieces will easily fit into the grinder.
Ready to Grind the Chicken
Here’s all the chicken ready for the grinder.
Choosing the Right Grinder
This is the grinder that I will be using today. It is a stand mixer attachment. I got this at Bed Bath & Beyond a while ago. They were selling it for around a hundred dollars, and I had a twenty percent off coupon, so I got it for around eighty dollars. At the time, I wanted to make small batches of homemade raw food, and I could not grind up any bones because everything that I fed had to be really soft and eventually totally pureed. So that’s why I bought this, just so I could do small batches.
Comparing Grinders
I do have a larger professional butcher series grinder that I normally use when I make homemade raw food for the cats. That grinder costs around five hundred dollars. This grinder is much cheaper and more accessible for more people, so that’s why today I am using this one. I’ll put a link in the description and the comment section below this video to where you can also purchase this food grinder. I still keep it in the box; I use it, then I clean it, and I put it right back in the box.
Setting Up the Grinder Attachment
This is the grinder attachment and the last time I used it, I used a really fine grind on it, but we don’t want to do that when we’re grinding up bones; we want to use a much coarser grind. This comes with three grinding blades: a fine, a medium, and a coarse blade.
Using the Coarse Grind for Chicken
Normally, I’ll use the coarse blade first, and I’ll use the pieces of chicken that don’t have bones like you know how we took bones out of a portion of the chicken. Normally, I would grind those coarsely, then change out the blade to the medium blade and grind up the pieces with the bones. But today I’m not going to do that; we’re just going to use the medium blade for everything. This meat grinder is a mini version of the larger meat grinder that I use when I’m making larger portions of cat food.
Attaching the Grinder to the Stand Mixer
Here’s my stand mixer, and this is where the grinding attachment goes. I’m going to take this piece off and just put in the grinding attachment, making sure the side is loose enough that it fits right in, and then we’re going to tighten it up. That was easy.
Using the Grinder
I normally use a large aluminium pan to catch the ground meat, so the ground meat will come out here and fall into the pan, making it easy to mix everything in a large pan. The first thing that I usually start with is the organ meats because they are the softest and easiest to go through the grinder. Then I follow them up with the firmer pieces of chicken, so I’m going to start with the chicken livers. Also, you want to make sure that you put your hand here in front of where the meat comes out in case anything splatters. That can happen when you first start grinding, especially with organ meats. You want to use speed number four.
Finishing the Grinding Process
Here’s all the meat that just went through the grinder. I am going to unplug the mixer, take the grinding attachment off, and then we’re going to add some more ingredients to this ground meat.
Adding Raw Egg Yolks to the Mixture
I am now adding raw egg yolks. You don’t want to add the egg whites because raw egg whites can block the absorption of certain nutrients, so it’s best to only use the yolks.

Conclusion
Making homemade cat food is a rewarding way to ensure your feline friends are eating a nutritious and well-balanced diet. By using fresh ingredients like chicken thighs, hearts, and livers, you provide essential vitamins and minerals that support your cat’s overall health and well-being. The process, though detailed, allows you to customize your cat’s meals to meet their specific needs and preferences.
From measuring and preparing the ingredients to grinding and mixing, each step is crucial in creating a meal that is not only cost-effective but also rich in the nutrients your cats need. By including organ meats like hearts and livers, you replicate the variety of nutrients that cats would naturally consume in the wild.
While the process may seem involved, the effort is worth it for the health benefits your cats will enjoy. Homemade cat food can improve their coat condition, energy levels, and overall vitality. Plus, it’s a great way to bond with your pets by taking an active role in their diet.
So, gather your ingredients, get your grinder ready, and start preparing delicious homemade meals for your furry companions. With a little practice, you’ll master the art of cat food preparation and ensure your pets are getting the best nutrition possible.